Table of Contents
Quality title tags and meta descriptions are important for SEO. Imperative, even. And yet, because of how large of a task it can be, many will procrastinate rather than diving in.
Related Content:
Writing or rewriting all of the title tags and meta descriptions, while working keywords into the copy, is a tremendous accomplishment for any mid- to large-sized website. And, unfortunately, just finishing them in the spreadsheet doesn’t mean you are done. You still have to actually get them into the CMS.
While this is easily done manually on a 10 page website, the time it takes to implement them for an enterprise site with thousands of pages could take up many precious hours.
For me, when it came time to add hundreds of title tags and meta descriptions, I knew the process was going to be extremely tedious and time consuming. After a while, myself and the WordPress SEO agency here at Go Fish Digital had a discussion on how we could automate this process.
What we found was a way to bulk import metadata such as title tags and meta descriptions for clients on WordPress using the Yoast SEO Plugin.
Items You Will Need To Bulk Import Metadata To Yoast
Before you begin, you’re going to need to do a little bit of prep work to ensure that you have all the required information and software to import the data:
- FTP & front-end access to the site (must be in WordPress)
- A CSV of the updated metadata
- The Really Simple CSV Importer
- The Yoast SEO for WordPress Plugin
- Cyberduck
Once you have the above items, then you’re ready to begin.
How To Bulk Import Metadata To Yoast
These are the steps to bulk import metadata using Yoast:
- Backup your website
- Extract every page’s post_id
- Map your post_id to the URL
- Bulk upload the data using a plugin
1. Backup Your Website
Before doing anything concerning changing large amounts of data on a website, it’s always a good idea to perform a site backup first. This is especially important if you are going to be changing information on hundreds of pages at once.
If you end up uploading the wrong data, you could be spending twice as much time going back through every page and manually changing the metadata again. Do yourself a favor and avoid this situation by performing a site backup before you start this task.
2. Extract Every Page’s post_id In WordPress
In order to import the metadata to the right location, you’re going to need to map it to the proper page. We can do this using the WordPress Post ID. Simply put, the post_id is a unique number assigned to every page on your WordPress site. You can actually see it in the URL when you’re editing a particular page.
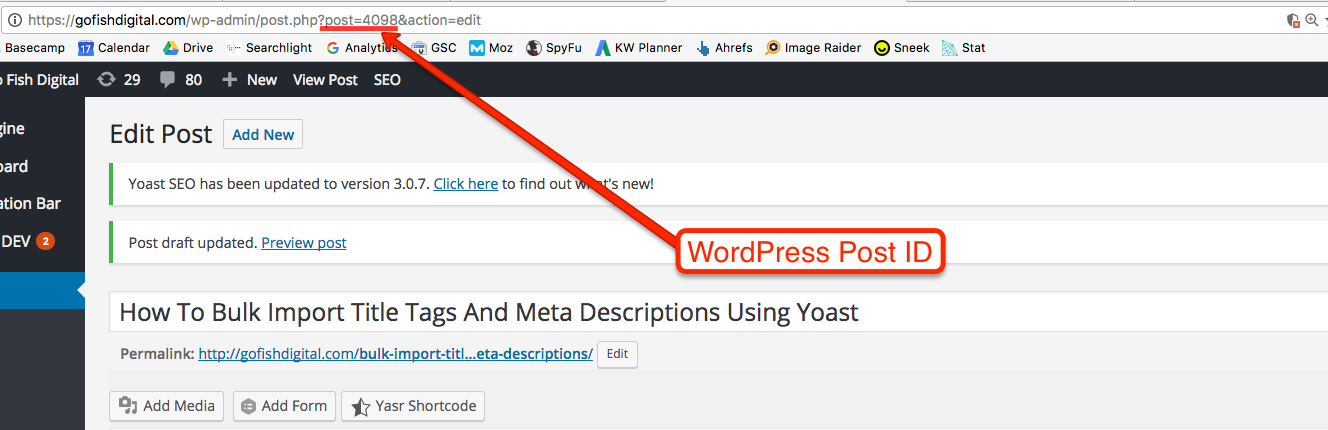
While you can find the post_id at the page level, the problem is that WordPress’s built in functionality doesn’t allow you to easily export all of a domain’s post_id’s. Instead, you’ll have to manually upload a PHP file to your server to get this information.
Fortunately, we’ve created a PHP snippet that will return the post_id. Save the following snippet as a PHP file named “export.php”.
————————-
<?php
include “wp-load.php”;
$wp_querywpcq1 = null;
$wp_querywpcq1 = new WP_Query();
$argswpcq1 = array(‘post_type’ => array(‘post’), ‘posts_per_page’ => 12, ‘order’ => ‘DESC’, ‘orderby’ => ‘date’, ‘paged’ => $paged);
$wp_querywpcq1->query($argswpcq1);
if ($wp_querywpcq1->have_posts() && $wp_querywpcq1->found_posts > 0):
while ( $wp_querywpcq1->have_posts() ) : $wp_querywpcq1->the_post();
echo “\n{“.$post->ID.”},{“.get_the_permalink().”},{“.get_the_title().”}”;
endwhile;
endif;
?>
————————-
Next, you’re going to need to connect to the server. Open up your favorite FTP client software (I use CyberDuck) and enter the proper credentials to connect. Once you’re connected, all you have to do is simply drag your “export.php” file into the root folder.
Now that you’ve uploaded your PHP snippet, it’s time to run it. To do this, go to “yourdomain.com/export.php”. This will execute your snippet and provide you with a document of all of the URLs on your website mapped to their associated post_id.
Export this information to a CSV and use “Text to Columns” to separate the URLs and post_ids.

3. Map Your post_id To The URL
Now that you have mapped a post_id to every URL on your website, it’s time to fetch the post_ids of just the pages you are changing. In a separate tab on your CSV, ensure that you have the following three columns of information about the pages to be updated:
- URL
- Recommended Metadata
- post_id (blank for now)
Next use the VLOOKUP function to grab the post_id from your original list. You should use the URL as the key for this function.
In this example, I changed the “Recommended Title Tag” field to “_yoast_wpseo_title”. This field is what allows Yoast to change the title tag of a post when the CSV is uploaded. However, this field will change based on what type of metadata you are importing to Yoast. Finally, after you have mapped the post_ids to the URLs, you can go ahead and delete the “URL” column. The final CSV you upload should only contain the following two columns:
- post_id
- Recommended Metadata (_yoast_wpseo_title in this example)

The great thing about this process is that you can bulk edit a lot of the information in Yoast using their Custom Fields. By referencing the table below, you should be able to update the metadata in Yoast for title tags, meta descriptions, canonical URLs and much more:
*Note: We have only tested this using title tags and meta descriptions
| Name | Custom Field | Values |
| Focus Keyword | _yoast_wpseo_focuskw | Text string |
| SEO Title | _yoast_wpseo_title | Text string |
| Meta Description | _yoast_wpseo_metadesc | Text string |
| Meta Robots Index | _yoast_wpseo_meta-robots-noindex | Blank for default, 1 for noindex, or 2 for index |
| Meta Robots Follow | _yoast_wpseo_meta-robots-nofollow | Blank for follow, 1 for nofollow |
| Meta Robots Advanced | _yoast_wpseo_meta-robots-adv | Blank for default, none, noodp, noydir, noimageindex, noarchive, or nosnippet |
| Include in Sitemap | _yoast_wpseo_sitemap-include | Blank for auto, always, or never |
| Sitemap Priority | _yoast_wpseo_sitemap-prio | Blank for auto, 1 to .1 |
| Canonical URL | _yoast_wpseo_canonical | Canonical URL of post |
| 301 Redirect | _yoast_wpseo_redirect | URL to redirect post to |
| Facebook Title | _yoast_wpseo_opengraph-title | Text string |
| Facebook Description | _yoast_wpseo_opengraph | Text string |
| Facebook Image | _yoast_wpseo_opengraph-image | URL to image |
4. Import Your CSV
Now that your CSV is ready, it’s time to upload it to WordPress. Download and activate the Really Simple CSV Importer plugin. Once installed, navigate to Tools >> Import >>CSV and upload the document. Sit back and let WordPress do the rest of the work for you. After the import is complete, run a crawl of the website to ensure that the information was imported properly.
Once you refine this process, it should only take around half and hour to bulk import metadata for hundreds or even thousands of pages to Yoast. Enjoy!
Search News Straight To Your Inbox
*Required
About Chris Long
Chris Long is the VP of Marketing at Go Fish Digital. With 10+ years of SEO experience, Chris works unique problems and advanced search situations to help clients improve organic traffic through a deep understanding of Google's algorithm and web technology. Chris has advised on the search strategies for clients such as GEICO, Adobe & The New York Times. He is a contributor for Moz, Search Engine Land, and Search Engine Journal. He is also a speaker at industry conferences such as MozCon, SMX East, BrightonSEO and more.Join thousands of marketers to get the best search news in under 5 minutes. Get resources, tips and more with The Splash newsletter: