


How to Create Dynamic Schema With Google Tag Manager
Published: July 29, 2025
Share on LinkedIn Share on Twitter Share on Facebook Click to print Click to copy url
For certain page types, schema (structured data markup) is a great thing to add to a well-optimized page. All you have to do is create the markup, add it to the <head> section of your page(s), and measure the expected result.
Related Content:
- Technical SEO Agency
- Ecommerce SEO Agency
- Google Analytics 4 Agency
- Conversion Rate Optimization Services
The problem is that you want to apply Article schema to your news blog posts, but you have 1,000 of them. Crack those knuckles and fire up a Spotify playlist, because you’re going to be writing a lot of code.
The solution is to add schema to any number of pages with just one piece of dynamic code.
This guide will show you how to:
- Create a schema code template
- Insert variables into that template
- Replace those variables with information from the page
- Add the schema code to any number of pages using Google Tag Manager
Let’s get started!
Step 1: Pick a Page Type
While this works for any page type, it makes more sense to choose a type that is represented by more than one page. Here are some page types this can work well on:
- Blog posts
- News articles
- Job postings
- Local pages
- Product pages
For this lesson, we’ll use a blog post:
(And if you’re looking to learn more about schema / structured data, that’s a great post to read).
Step 2: Create the Schema Code Template
I’ll use Merkle’s Schema Generator to create templated code that works well for our purposes. I chose the Article type, and here is what it generated:
<script type=”application/ld+json”>
{
“@context”: “https://schema.org”,
“@type”: “Article”,
“mainEntityOfPage”: {
“@type”: “WebPage”,
“@id”: “”
},
“headline”: “”,
“image”: “”,
“author”: {
“@type”: “Person”,
“name”: “”
},
“publisher”: {
“@type”: “Organization”,
“name”: “Go Fish Digital”,
“logo”: {
“@type”: “ImageObject”,
“url”: “https://gofishstaging.wpengine.com/wp-content/uploads/2021/09/gfdlogo_primary-color-square.png”
}
},
“datePublished”: “”
}
</script>
All of the empty quotes represent empty values. We’ll pull in things like blog headline, image URL, and other values using variables.
Step 3: Turn Values into Variable Names
Replace each empty value with a variable name. Choose the most logical variable names possible. Put variables inside double curly braces (this is how Google Tag Manager recognizes something as a variable).
Notice how most of my variable names have underscores, but one does not:
<script type=”application/ld+json”>
{
“@context”: “https://schema.org”,
“@type”: “Article”,
“mainEntityOfPage”: {
“@type”: “WebPage”,
“@id”: {{Page URL}}
},
“headline”: {{Blog_Heading}},
“image”: {{Image_URL}},
“author”: {
“@type”: “Person”,
“name”: {{Author_Name}}
},
“publisher”: {
“@type”: “Organization”,
“name”: “Go Fish Digital”,
“logo”: {
“@type”: “ImageObject”,
“url”: “https://gofishstaging.wpengine.com/wp-content/uploads/2021/09/gfdlogo_primary-color-square.png”
}
},
“datePublished”: {{Publish_Date}}
}
</script>
This is foreshadowing a bit, but – Google Tag Manager has some built-in variables, and they are already named. “Page URL” is one of them – this is the variable in the code above that does not have an underscore.
The rest of the variables in the code will be user-defined (meaning I’ll create them), and I like to use underscores to differentiate my own variables from those that are already built into GTM. It’s a preference, but I do recommend doing this.
Step 4: Create the Variables
4a. The GTM method
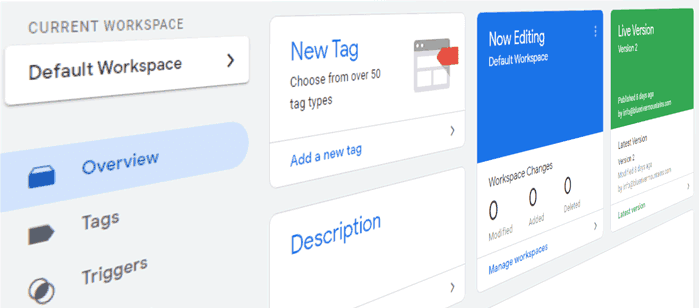
Create the variables that will insert information into our schema code. Go to GTM > Variables:

{{Page URL}}
The first variable in our code, {{Page URL}}, is built into GTM:
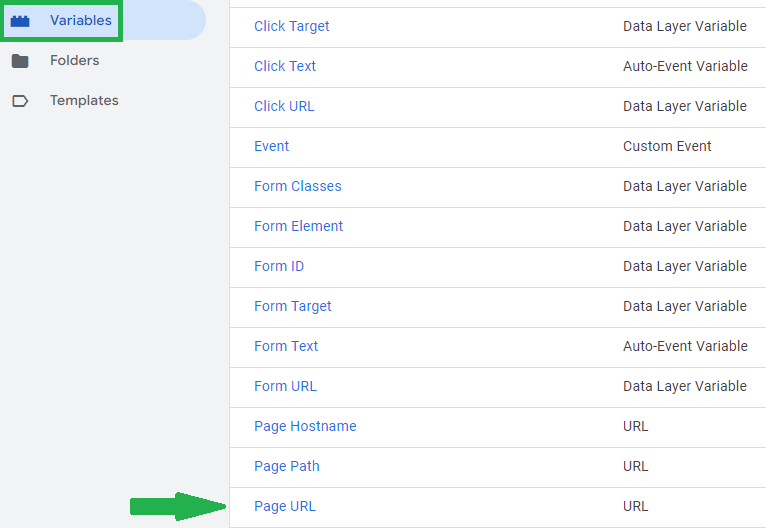
The page URL, in this case the address of the blog post, will be inserted into our code. Pretty nice!
{{Blog_Heading}}
The next variable is {{Blog_Heading}}, and we’ll have to build that one. Scroll down to “User-Defined Variables” and click “New.”

Name this variable “Blog_Heading.” Next, choose “DOM Element” as the variable type. You’ll do this for all subsequent variables.
Then, help GTM find the page information we’re looking for. This is the trickiest part to understand, so take your time with this part and be open to researching anything that doesn’t make sense (Google and/or ChatGPT are good options for this).
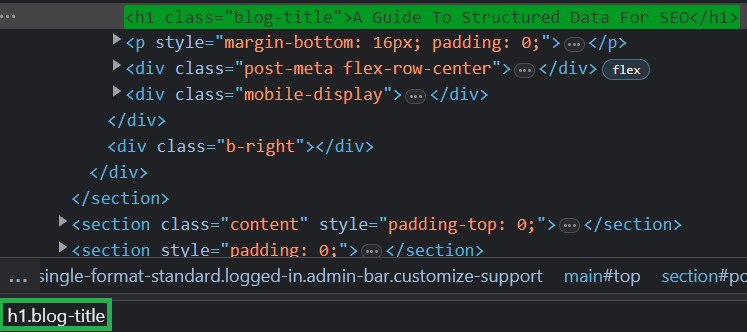
The title of the blog post I’m attempting to create schema code for is “A Guide To Structured Data For SEO.” Looking at the code, I can see that the blog title is an h1 HTML tag with a CSS class of “blog-title.”

I can find the title of the blog using the HTML tag:
- h1
And the CSS class:
- .blog-title
- (CSS classes are “called” with a period character)
Combine the two to make a very specific selector:
- h1.blog-title
Go Fish codes all of their blog titles like this – they are wrapped in an h1 tag, and they use the “blog-title” CSS class. It’s very important that we choose a selector that will work on all blog posts. The more organized a site’s code is, the more possibilities it opens up, and this is a perfect example of that. This will make it really easy to find blog headings and insert them into our schema code. Speaking of finding the blog heading, let’s finish building this variable in GTM:
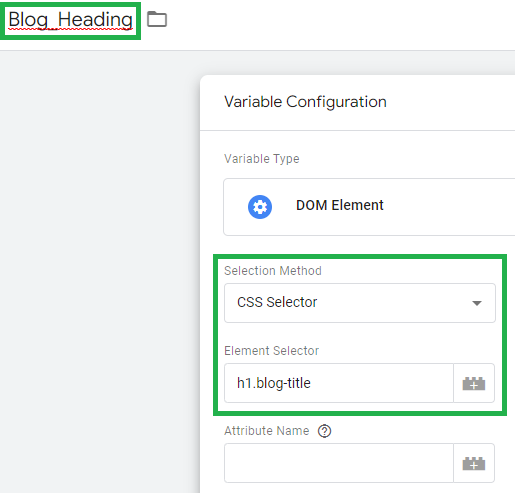
The combination of HTML tag reference and CSS class reference is called a “CSS Selector.” It’s almost like a breadcrumb trail that leads to the information you’re looking for. It might not always work this cleanly, but we’ll try to reference like this each time, and when it fails, we’ll look for another way. Here are some additional tips when finding a reference to the information for your variable:
- Be as specific as possible. We could have referenced this information with just the CSS class, “.blog-title,” but I had the option of being more specific and including the h1 reference, so I went with that.
- Search the DOM using your selector to be sure it’s the only instance found in the code. Search it on a sample set of pages to be sure things are coded consistently.
{{Image_URL}}
Our next variable is {{Image_URL}}. This is the featured image of the blog post. We need somewhere in the code that references this image consistently across all blog posts. The OG Image is perfect for this – it’s what Facebook uses, and the image URL will always be found in a particular meta HTML tag in the code of our blog posts:

We’ve already run into a case where we’ll have to change how we reference the information we’re looking for. We’ve got the HTML tag (“meta”), but there’s no CSS class. First, we’ll identify the specificmeta tag we’re looking for:
- meta[property=”og:image”]
Then, we’ll help GTM find the image URL by naming the “content” attribute within the meta tag. Here’s how that will look:

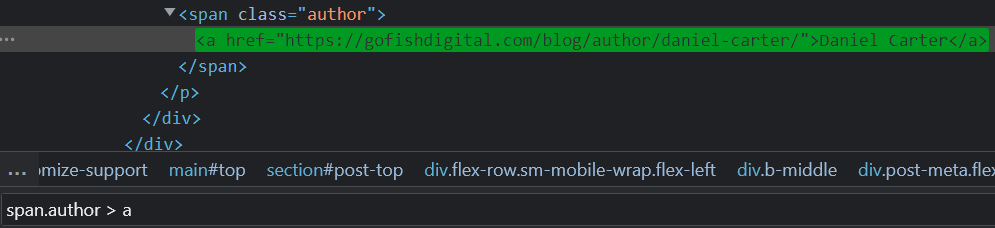
{{Author_Name}}
Use Chrome to inspect the author’s name and show the following code:

Select the author’s name with:
- span.author > a
This is similar to the first technique we used, HTML tag + CSS class. But the path to this information includes one additional HTML tag, so we continue the path with “>” and then state the tag (“a”). Search the code to confirm your selector is finding the right information:
{{Publish_Date}}

- div.info > p
All variables are created, and GTM is able to find the information we’d like inserted into our code dynamically.
Step 5: Create a Script
Some Javascript is needed to get things working right. The code is wrapped in HTML “script” tags, and you’ll see our schema code dropped right in the middle of the JS. You can use this script for any code template you create, just insert your code in place of mine.
<script>
(function(){
var schema=
{
“@context”: “https://schema.org”,
“@type”: “Article”,
“mainEntityOfPage”: {
“@type”: “WebPage”,
“@id”: {{Page URL}}
},
“headline”: {{Blog_Heading}},
“image”: {{Image_URL}},
“author”: {
“@type”: “Person”,
“name”: {{Author_Name}}
},
“publisher”: {
“@type”: “Organization”,
“name”: “Go Fish Digital”,
“logo”: {
“@type”: “ImageObject”,
“url”: “https://gofishstaging.wpengine.com/wp-content/uploads/2021/09/gfdlogo_primary-color-square.png”
}
},
“datePublished”: {{Publish_Date}}
}
var script=document.createElement(‘script’);
script.type=”application/ld+json”;
script.innerHTML=JSON.stringify(schema);
document.getElementsByTagName(‘head’)[0].appendChild(script);
})(document);
</script>
It’s good to know what the JS is doing here:
- var schema= creates a variable called “schema” that will hold the JSON-LD data.
- var script=document.createElement(‘script’); creates a new script HTML tag.
- script.type=”application/ld+json”; indicates that the script contains JSON-LD data.
- script.innerHTML=JSON.stringify(schema); turns the schema code into a string (letters, numbers, punctuation, etc.) and puts it inside the script tags.
- document.getElementsByTagName(‘head’)[0].appendChild(script); puts the entire script into the <head> of the page as a child element.
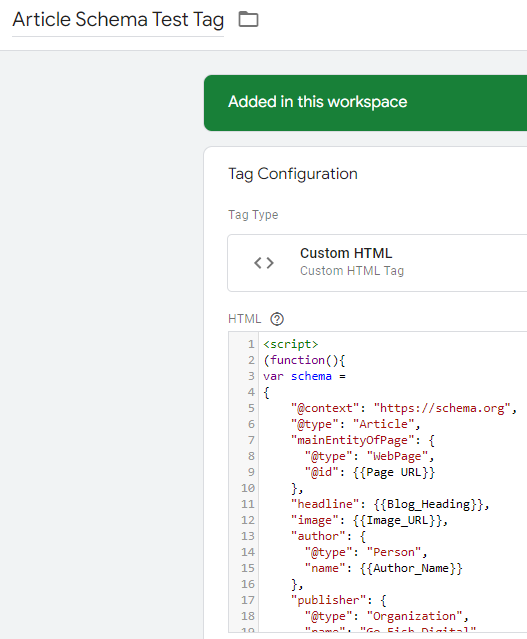
Step 6: Create a Google Tag Manager Tag
Click “Tags.” Choose “Custom HTML” as the tag type, and paste the script in.
Step 7: Create a Google Tag Manager Trigger
As you’re creating the tag, you should see the option to create a trigger just below. This is where we’ll tell GTM to insert our dynamic code into every instance of our chosen page type.
Choose “Page View” as the trigger type. The trigger will fire on “Some Page Views.” The trigger will fire when the Page Path contains “/blog/” (in this case).
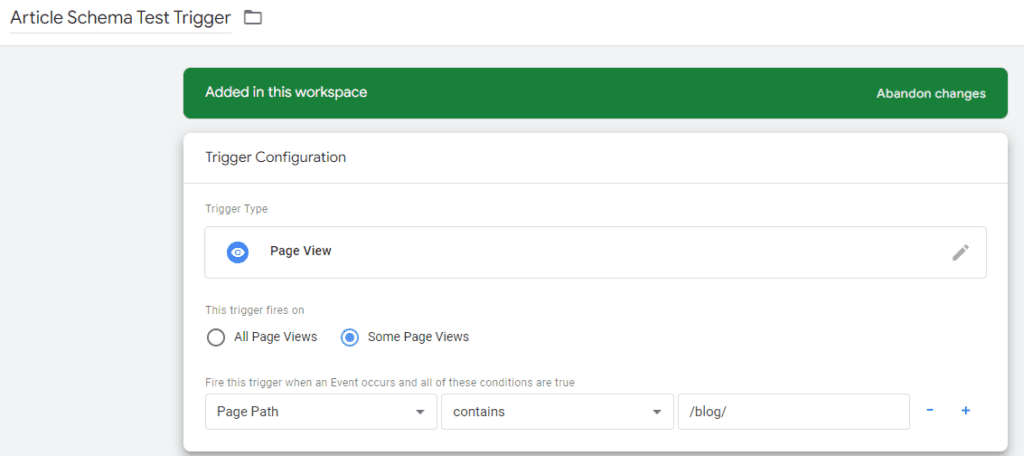
Save the trigger and the tag.
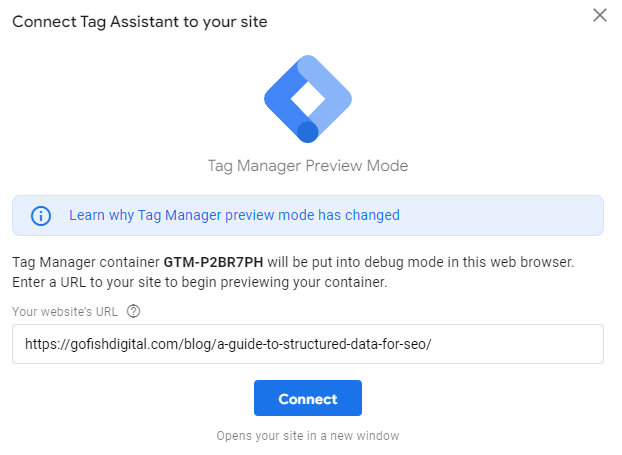
Step 8: Test the Staging Implementation
Click “Preview” in the upper right. Enter the a URL you’d like to test and click “Connect.”
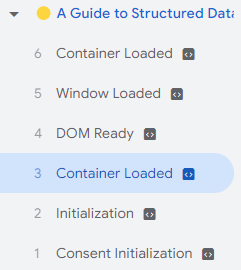
Confirm that Tag Assistant has connected.

Choose the first instance of “Container Loaded” and confirm that your tag has fired.
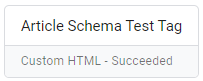
Click into the fired tag to confirm your trigger is working as intended.
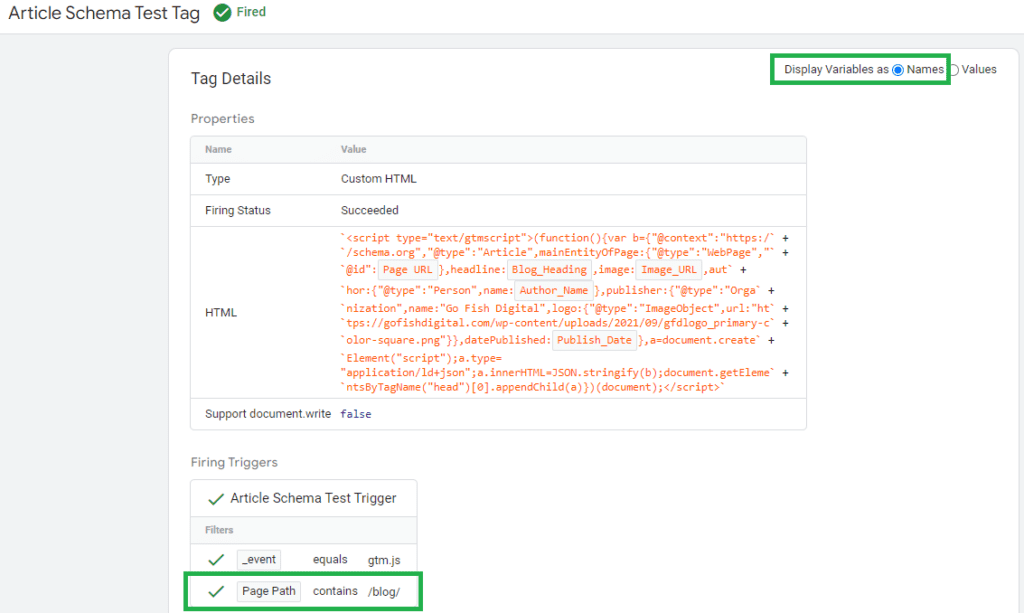
Return to the previous screen and click “Variables” (with “Container Loaded” selected) to confirm your variables are working as intended.

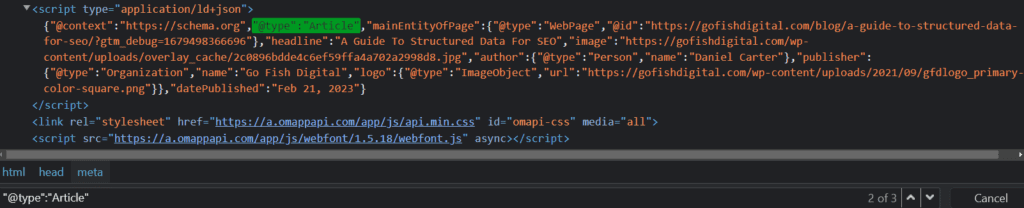
Check the DOM of the page you’re previewing (you’ll see “?gtm_debug=” in the URL). I can see our inserted script, the schema template, and the correct information inserted via our variables.
These are some checks you can do to ensure everything is working correctly. Test a sample set of pages to confirm further.
Step 9: Test the Live Implementation
Now it’s time to push the tag live! Click the blue “Submit” button in GTM, next to the “Preview” button.
With the changes live, and as done in the previous step, check the DOM of a sample set of pages to ensure the code is being inserted and inserted correctly. Then, run it through a tool like https://validator.schema.org/. Once again, you’ll want to check a number of pages.

And that’s it! In this exercise, we:
- Created a schema code template
- Inserted variables into that template
- Replaced those variables with information from the page
- Added the schema code to all blog posts using Google Tag Manager
Bonus (JS Variables)
We can do the same thing using JS to build our variables. The reason I like this method so much is that it’s a little more flexible for selecting elements. I’ve hit limitations using the method above that I was able to get around by using JS variables rather than building them in GTM (admittedly, could be user error).
Let’s look at the anatomy of creating a variable and selector using JS:
Full example: var blogHeading = document.querySelector(‘h1.blog-title’).innerText;
- var blogHeading sets our first variable as “blogHeading.” I chose a different (and more Javascripty) naming convention to avoid confusing variables with those written above.
- document.querySelector(‘h1.blog-title’) searches the document for an h1 tag with a class of “blog-title.”
- innerText selects the text found within our selector.
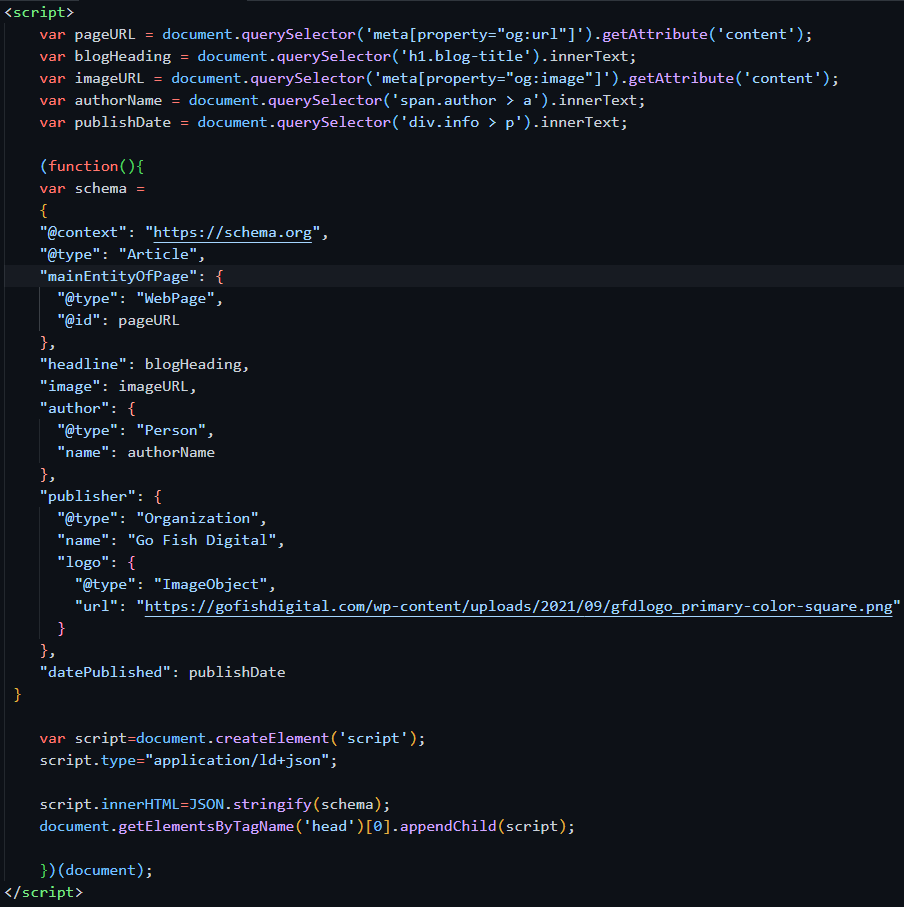
The JS syntax is pretty logical once you get used to it, and the selection method closely mirrors what we did earlier. Here are all of my variables and selectors for this example:
- var pageURL = document.querySelector(‘meta[property=”og:url”]’).getAttribute(‘content’);
- var blogHeading = document.querySelector(‘h1.blog-title’).innerText;
- var imageURL = document.querySelector(‘meta[property=”og:image”]’).getAttribute(‘content’);
- var authorName = document.querySelector(‘span.author > a’).innerText;
- var publishDate = document.querySelector(‘div.info > p’).innerText;
Check to make sure these are selecting the right information. Open Chrome Inspector, select “Console,” and enter a selector (without the variable statement):

Everything appears to be pulling the correct information. On to the schema code template:
{
“@context”: “https://schema.org”,
“@type”: “Article”,
“mainEntityOfPage”: {
“@type”: “WebPage”,
“@id”: pageURL
},
“headline”: blogHeading,
“image”: imageURL,
“author”: {
“@type”: “Person”,
“name”: authorName
},
“publisher”: {
“@type”: “Organization”,
“name”: “Go Fish Digital”,
“logo”: {
“@type”: “ImageObject”,
“url”: “https://gofishstaging.wpengine.com/wp-content/uploads/2021/09/gfdlogo_primary-color-square.png”
}
},
“datePublished”: publishDate
And the full code:
Tips
If you do run into a tricky scenario regarding your selectors (i.e., nothing you try will select exactly what you’re after), try selecting the element, right-clicking in the DOM, and copying the selector. Some selector paths will be long, but it’ll work.

Additionally, if you’re not getting the desired output from your selector using “innerText,” you can also try “innerHTML” or “textContent.”
Testing Steps
- Create a custom HTML tag in GTM and paste this code in.
- Create a trigger that fires on all desired page types.
- Select “Preview” and inspect the DOM to ensure the code is present and correct.
- Submit the tag and check the live page.
Conclusion
Remember that you can do this for almost any page type on your site. With these methods, you’ll apply schema to your existing pages, and GTM will automatically insert the code on to future pages as well. Give it a try and let me know how it works!
Credit to Anoop T Unnikrishnan for his post on this topic that inspired us to write our own about it!