Table of Contents
If you’ve done any website work over the last 5 years, it’s almost guaranteed you’ve heard of HTTPS. HTTPS is the new promising Internet protocol, making the web more secure for all users. It’s also one of the fastest growing Internet trends, as the number of HTTPS sites doubled in 2016.
Related Content:
We’ve worked with several clients to implement HTTPS on their sites, and in the process, have learned to resolve many of the issues an HTTPS migration can create. Our guide to a seamless HTTPS migration is below, but first, an overview:
What is HTTPS?
For anyone unfamiliar with HTTPS, here’s a basic overview of the process: When navigating the web, content is communicated via a “Hypertext Transfer Protocol”. This is the “HTTP” prefix that you see at the beginning of a URL (https://www.example.com), and it is what enables servers and clients to communicate and display internet content to you.
HTTPS is a more secure version of the HTTP protocol. It adds an SSL security certificate to the server/client communication, which ensures that sensitive information like passwords and credit card info can’t be stolen by malicious lurkers while traveling between the server and a user’s computer. Most importantly, it adds a clear indicator for users that your site is secure and safe:

In principle, migrating to HTTPS is as simple as adding an SSL certificate to your website. In practice, that can be a tedious and exhausting process. The Washington Post described their 10-month migration in 2015, explaining each of the various issues and obstacles they encountered.
In order to add an SSL certificate to a site, you need to first obtain a certificate, then apply it across the entire site, and then maintain it to make sure it doesn’t expire or lapse in the future. For larger sites, especially those with an ecommerce platform or login portal, this can be a very exhausting process. Furthermore, you run the risk of a temporary to permanent traffic and keyword ranking drop, like Moz’s 11% organic drop over 3+ months.

Why do I care about HTTPS?
Google has been one of the strongest advocates for websites to adopt HTTPS since as early as 2014, and for good reason. Having a more secure web makes everyday life infinitely easier for the vast majority of internet users. How many of you would hesitate to shop on Amazon if you knew someone could steal your credit card info? How many of you would use email if you knew someone could snoop on what you’re sending? Web security is crucial in this day and age, but don’t mislead yourself into thinking that makes it easy to implement.
Fortunately for internet users (though perhaps unfortunately for webmasters and SEOs), HTTPS is here to stay. John Mueller, from Google, is insistent that this is a move webmasters need to make:
@rchtjn Well, turning the website off saves money too.
— John ☆.o(≧▽≦)o.☆ (@JohnMu) December 18, 2015
More recently, Gary Ilyes, Webmaster Trends Analyst at Google, announced a major change to how Google measures PageRank for 301 redirects to help facilitate this transition:
30x redirects don’t lose PageRank anymore.
— Gary Illyes ᕕ( ᐛ )ᕗ (@methode) July 26, 2016
By allowing redirects to pass 100% of PageRank, instead of 80-90% like before, Google is hoping to incentivize more and more sites to adopt HTTPS without needing to worry as much about the organic loss that might come from that.
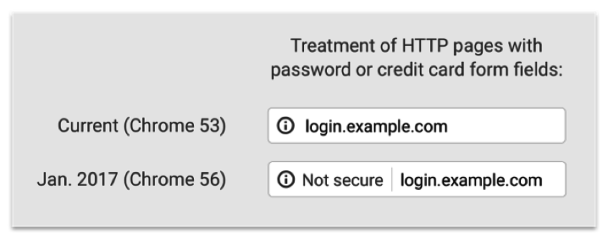
Finally, Google announced that as of January 2017, any sites that collect credit card information or passwords that are NOT using HTTPS will be marked as “Not Secure” on Google Chrome:
After working with several clients to implement HTTPS, we’ve compiled a list of what’s involved in the 3 main steps of an HTTPS migration:
- Pre-migration
- Migration
- Post-migration
Pre-Migration
Backup, backup, backup. I cannot repeat this enough. Backup your site before initiating your HTTPS migration.
There are any thousands of things that can go wrong during an HTTPS migration, including things you didn’t even think were possible to go wrong. Download a backup of your media library. Save backups of your CSS and JS files. If you backup your whole site configuration, then you can easily disable your SSL certificate if you see things go wrong after enabling SSL.
Again, I can’t reiterate how many things can go wrong that you won’t anticipate in a million years. Backup your site.
Migration
The Holy Grail, the actual migration itself. This is where all the pain and suffering preparation pays off.
Fortunately for webmasters, there are several easier ways to migrate to HTTPS than a conventional SSL implementation. ClouldFlare and Let’s Encrypt are two services we’ve used with smaller sites that I highly recommend for an HTTPS migration.
**NOTE: Cloudflare recently had a major security vulnerability exposed, so be cautious to adopt Cloudflare SSL right away. Once the issue is fully resolved, however, this should be a viable service once again.
Each of these are completely free services. They provide the same level of SSL encryption and security without a lot of the hassle involved with a full SSL implementation. You can read more about each service on the links above, but the basic principle of Cloudflare is that they will provide an SSL certificate for free, then serve up a cached version of your site to searchers that is completely secure. The communication between your server and the client won’t be secure, but site visitors will still arrive at a secure site.

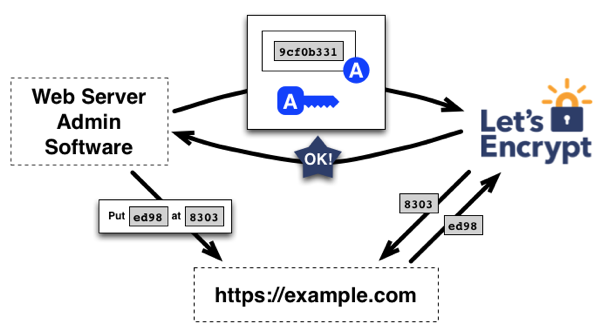
Let’s Encrypt, on the other hand, offers a free SSL certificate that can be automatically configured through a web server like WPEngine. Once the certificate authority validates the domain, Let’s Encrypt provides the SSL certificate to the entire site.
If you opt to not go with this option, then the best recommendation is to test everything before pushing it live on your site. If you have a staging site, test the SSL implementation on every page there before migrating your live site. Review everything, including the links in your sitemaps and robots.txt files, links across your site, images, submission forms, everything.
Finally, make sure you have a global redirect in place to grab any links pointing to the HTTP version of your site. CloudFlare and Let’s Encrypt (and most other environments) will automatically set up this redirect, but make sure this is included in your transition. The last thing you want is to lose the equity from your backlinks.
At the same time, review the URL structure you use for on-site links. If your links use a full URL path (https://www.example.com/stuff/) instead of relative URL paths (/stuff/), those links may not be updated after your migration. Don’t give Google any more excuses than they need to deprecate your link profile: double-check both of these features.
Post Migration
Just because your migration is complete doesn’t mean your work is over yet. Sometimes, the aftermath can be just as difficult as the actual migration itself.
The first thing you’ll want to do is review 3rd party scripts on your site. We had one client who completed an HTTPS migration only to discover that their entire typeface across the site disappeared. Their custom fonts were replaced by the default block letters in WordPress, making the site look clunky and unwieldy. The problem, we discovered, was that their typeface was imported from a 3rd party service that did not provide the font library as an HTTPS file. Once we were able to update the file to an HTTPS protocol, the fonts returned to normal.
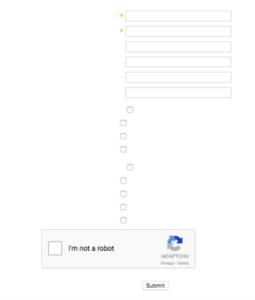
Another client working on a migration had a number of submission forms across the site imported from Pardot.com. Despite the fact that most other resources on the site migrated correctly, these submission forms did not, leaving a series of blank input boxes where there had previously been full subscription forms. Like before, it turned out that the subscription forms did not migrate to HTTPS by default. Once we updated the links, the forms were good to go.
The most common issues we’ve encountered are insecure images. One of the first warnings you’ll probably notice is an error message like the one below:
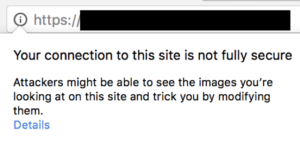
Often during a site migration, images that are included on the site have insecure URL addresses. Even after migrating your site over, images imported from external sites often still have an insecure URL, which prompts Google Chrome to warn users that the content on the site may be compromised.
Some of you right now are saying, “But how am I supposed to check every image on my site to know which are secure and which aren’t?” Lucky for you, we have a solution. Within Screaming Frog, while crawling a site, you can set a custom extraction to search for images with an HTTP address.
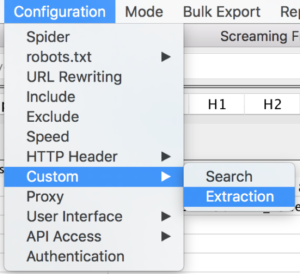
The custom extraction must be set to an XPath type and set to extract an HTML element. Then, use the following snippet as the extraction code:
//img[contains(@src,'https://')]
![]()
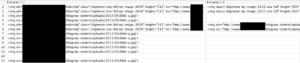
After your crawl is complete, the “Extraction” tab will have an entire list of pages with insecure images and the source code for those images. From there, you can update the URLs to HTTPS addresses.
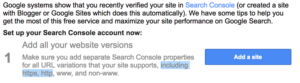
The second thing you’ll want to do is add the HTTPS version of your site to Google Search Console. It will take Google some time to recognize that your site is now secure and to switch the ranking results it displays to users. The sooner you verify the HTTPS version of your site in Search Console, the faster Google can start indexing the secure site and serving that to users in search results.
Third, in addition to HTTPS, you want to ensure that your server is using HTTP/2.0, the latest version of the general Internet protocol. If you use CloudFlare or Let’s Encrypt from above, your server should be HTTP/2.0 compatible by default. Just in case though, it never hurts to run a quick check on https://tools.keycdn.com/http2-test.
The final step you’ll want to take after your migration is to constantly monitor your organic traffic over the following weeks and months. As Rand Fishkin noted in the link above, Moz lost 11% of the their search traffic over the 3 months following their migration, and many other sites have reported similar losses.
Though you may have few options for recovering that traffic immediately, you’ll want to pay attention to what search queries you’ve dropped in ranking for, or what pages see a drop in organic traffic. Assuming that these pages don’t recover quickly, that may be a sign that you have a deeper problem on the site. If it is a deeper problem, follow the steps for what to do when your organic traffic drops.
Again, migrating to HTTPS is a step that you have to take. Google is only becoming more and more insistent about this, and it’s also an integral part of delivering a positive user experience to your site visitors. Unfortunately, just because this is important doesn’t mean it’s quick or easy. Follow our guide above, and you can avoid the most common traps and pitfalls of an HTTPS migration. The benefits are worth it.
Search News Straight To Your Inbox
*Required
About JR Ridley
JR has been working the world of SEO and web design for 5 years now. As a political science major, he decided the most relevant use of that political science knowledge was in the completely unrelated world of Digital Marketing, and he's been working with Go Fish Digital ever since. He has overseen technical SEO for businesses of all sizes, is Google Analytics certified, and also can code in HTML, Java, and C++. He has written for Moz, Search Engine Land, and RankWatch, and most recently appeared on an episode of MozPod to discuss HTTPS migrations. Doubling as a soccer referee, he spends most weekends on soccer fields around northern Virginia or loudly cheering on the New England Patriots.Join thousands of marketers to get the best search news in under 5 minutes. Get resources, tips and more with The Splash newsletter: